
Install Lightroom Presets on iOS, Android, and Computer
Here is the complete tutorial about installing and applying Lightroom Presets on iOS, Android, and Computer devices. Using Presets in Lightroom you can easily edit your photos for posting on social media. You can Make your photo professional with just a click, using the Preset which we PDFuploads provide you free. You can download Free Adobe Lightroom Presets as .dng Files from our website PDFuploads, we have a large collections of Presets which are totally free to use for all.

This Post will teach you, how to Download and Install the Preset designs to your Mobile lightroom Application, both Android and iOS as well as desktop Lightroom software. You can download Lightroom Mobile from Playstore and Lightroom Windows from the official website, also Lightroom is available for iOS in the Apple store
What are Adobe Lightroom Resets?
Adobe Lightroom presets are pre-configured options for this well-liked photo-editing program. Presets allow you to quickly and easily apply an awesome look or style to a number of photographs without having to manually change each one's particular settings.
Edit Photos with a Single Click
A Lightroom preset is simply a collection of edits to a photo that is saved and can be applied with a single click to other photos. Adjustments for exposure, contrast, colour balance, tone curve, sharpness, and other factors can be included in presets.
Lightroom presets come in a wide range of varieties, some of which are created for particular categories of photography like landscape, portrait, or black-and-white photos. Additionally, some presets are made to mimic the appearance of film, while others produce more contemporary and stylized effects.
Preset Files and Formats
How to add Presets on Android Lightroom?
1. First Download and Install Lightroom on your Android Mobile, Open Lightroom Application and Sign in
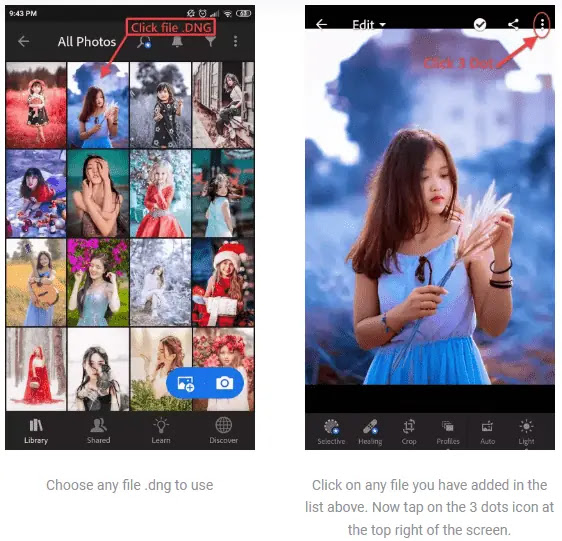
2. Download the beautiful Lightroom Preset from PDFuploads (.dng Files will get downloaded)
3. In Lightroom, Click on the Image adding the "+" icon.

4. Now you can see the Downloaded Preset Image, Select that and click Add

5. Now Open the Added Preset Image in the Lightroom
6. Click the 3-dots, Select Create Preset

7. Give a name for your new Preset and Click on Tick Mark

Done! Your New preset is created, Now Select any Photos you need to edit, and you can find your created new Preset in the User Preset List


How to add Presets on iOS Lightroom
- First, download the DNG preset file(s) that you want to add to your Lightroom app. You can download DNG preset files from PDFuploads Free Lightroom Preset Collections.
- Once you have downloaded the DNG preset file(s), save them to your iOS device's camera roll.
- Open the Lightroom app on your iOS device.
- Tap on the "+" icon in the top right corner of the screen to create a new album.
- Name the new album, and then tap on the newly created album to open it.
- Tap on the "+" icon again, and then select "Add Photos" from the dropdown menu.
- Select the DNG preset file that you downloaded and saved to your camera roll.
- The DNG preset files will be added to the album, and you can now apply them to your photos.
- To apply a preset to a photo, open the photo in the Lightroom app and tap on the "Presets" button at the bottom of the screen.
- Select the DNG preset that you want to apply from the "User Presets" section.
- The preset will be applied to the photo, and you can further adjust the settings if necessary.
How to add Presets on Windows Lightroom
To add DNG file presets on Windows Lightroom, you can follow these simple steps:
- First, download the DNG preset file(s) that you want to add to your Lightroom app. You can download DNG preset files from PDFuploads Free Lightroom Preset Collections.
- Once you have downloaded the DNG preset file(s), save them to a location on your computer that you can easily access.
- Open the Lightroom app on your Windows computer.
- In the top menu bar, click on "Edit" and then select "Preferences".
- In the Preferences menu, select the "Presets" tab.
- Click on the button that says "Show Lightroom Presets Folder".
- This will open a new window showing the location of your Lightroom presets folder.
- In the presets folder, navigate to the "CameraRaw" folder and then to the "Settings" folder.
- Copy the DNG preset file that you downloaded and saved to your computer, and paste them into the "Settings" folder.
- Close and reopen the Lightroom app.
- To apply a preset to a photo, open the photo in the Lightroom app and click on the "Develop" module.
- In the presets panel on the left side of the screen, you should see the DNG preset(s) that you added to the "Settings" folder.
- Select the DNG preset that you want to apply, and it will be applied to the photo.
That's it! You have now successfully added DNG file presets to your Windows Lightroom app.
HOW TO ADD DNG/PRESET FILES INTO LIGHTROOM MOBILE

.webp)

.webp)
CREATE NEW PRESETS FROM DNG FILES


EDITING PHOTOS IN LIGHTROOM FROM THE PRESETS YOU CREATED ABOVE


In general, Lightroom presets can be a helpful tool for photographers who want to simplify their editing workflow and achieve a unified aesthetic throughout their body of work.
{getButton} $text={Free Lightroom Presets Full Collections} $icon={download} $color={#1bc517}